Difference between revisions of "Bill of materials"
(→Hand tools) |
|||
| Line 120: | Line 120: | ||
* Crimper Tool | * Crimper Tool | ||
* Laminate Scorer | * Laminate Scorer | ||
| − | ** You might prefer using a miter box with saw, especially with thicker materials. This is what I ended up doing<ref>https://www.youtube.com/watch?v=GAAShGDHlOE | + | ** You might prefer using a miter box with saw, especially with thicker materials. This is what I ended up doing<ref>[https://www.youtube.com/watch?v=GAAShGDHlOE Cutting out 8 pieces of 15 1/2” by 1/4” Square Acrylic Rods (Continued)]</ref>. |
| − | ** In the actual S.H.O. Drive build, the laminate scorer was used for cutting tape instead of cutting acrylic<ref>https://www.youtube.com/watch?v=i_gqF4IUmzk | + | ** In the actual S.H.O. Drive build, the laminate scorer was used for cutting tape instead of cutting acrylic<ref>[https://www.youtube.com/watch?v=i_gqF4IUmzk Improving the Electrical Tape Wrap around the S.H.O. Coil Windings (Continued) + Adjusting Hook Positions (Continued)]</ref>. |
* Mailing Tube | * Mailing Tube | ||
** The 2.25" diameter mailing tube that came with the acrylic rods was ideal for the project. | ** The 2.25" diameter mailing tube that came with the acrylic rods was ideal for the project. | ||
| Line 138: | Line 138: | ||
** Not an effective way to bend the copper coils. Disregard. | ** Not an effective way to bend the copper coils. Disregard. | ||
* X-Acto Knife | * X-Acto Knife | ||
| − | ** Originally, the X-Acto Knife was intended for cutting small wooden shims<ref>http://www.sho.wiki/now/Presentation/Phase_4#Reinforcements</ref>. | + | ** Originally, the X-Acto Knife was intended for cutting small wooden shims<ref>[http://www.sho.wiki/now/Presentation/Phase_4#Reinforcements April 2016 Presentation → Phase 4 : Reinforcements]</ref>. |
** In the actual build, there are no wooden shims, and so I didn't use the the X-Acto Knife during the build. | ** In the actual build, there are no wooden shims, and so I didn't use the the X-Acto Knife during the build. | ||
| Line 151: | Line 151: | ||
* Sanding Bands & Drum | * Sanding Bands & Drum | ||
| − | In the actual build (no wood), I opted for acrylic panels. I made *.dxf AutoCAD files and sent them to Metrix Create Space<ref>http://www.metrixcreatespace.com/#makesomethingawesome</ref> for CO2 laser cutting<ref>http://www.metrixcreatespace.com/#12hoursaday</ref>. So for the actual build, I needed ''none'' of the above tools. | + | In the actual build (no wood), I opted for acrylic panels. I made *.dxf AutoCAD files and sent them to Metrix Create Space<ref>[http://www.metrixcreatespace.com/#makesomethingawesome Metrix Create:Space - Laser Cutting and Etching]</ref> for CO2 laser cutting<ref>http://www.metrixcreatespace.com/#12hoursaday</ref>. So for the actual build, I needed ''none'' of the above tools. |
==Sharing needs== | ==Sharing needs== | ||
| Line 170: | Line 170: | ||
* Tachometer | * Tachometer | ||
* True-RMS Multimeter | * True-RMS Multimeter | ||
| − | * Thermal Camera<ref>http://www6.homedepot.com/tool-truck-rental/Thermal_Camera/FLIR_i7/ | + | * Thermal Camera<ref>[http://www6.homedepot.com/tool-truck-rental/Thermal_Camera/FLIR_i7/ A high-quality thermal camera can be affordably rented from the Home Depot.]</ref><ref>[http://www.slideshare.net/Transcat/emissivitywebinarflirtranscat03252014 Emissivity and the Potential Impacts on your Thermal Measurement]</ref> |
Some S.H.O. Drives may require higher amp-capacity connecting leads than ones included with the device(s), so those should be bought as needed. | Some S.H.O. Drives may require higher amp-capacity connecting leads than ones included with the device(s), so those should be bought as needed. | ||
Revision as of 11:58, 14 November 2016
This Bill of materials is designed to take into account your particular project goals. "Materials" herein is referred to in a broad sense, including not only the material parts which make up the device, but also the "materials" of the project as a whole activity, including safety gear, hand tools, power tools, furniture, measuring devices, and recording devices.
Parts
All S.H.O. Drives will share certain things in common.
- Every S.H.O. Drive will contain one or more conductive windings, and each will look like an S, an H, or an O depending on how viewed and may be referred to as a S.H.O. Coil.
- Every S.H.O. Drive will contain one or more permanent magnets located inside the S.H.O. Coil(s) which will rotate mechanically.
- Every S.H.O. Drive will contain a support structure to carry the winding(s) and permanent magnet(s).
S.H.O. Drives will differ in their implementation. For each S.H.O. Drive, the parts must have some level of compatibility with each other. Design specifics may vary widely, and the overall size of each S.H.O. Drive is probably the most important of them.
S.H.O. Drive Alpha
S.H.O. Drive Mark Alpha refers to the original plan for world's first S.H.O. Drive. The actual build will incorporate clear acrylic tubes to elevate the wooden panels inside the crate for maximum transparency and minimization of the ways to hide batteries. A build and demonstration was planned for the 4th of July, but I decided that more planning was need in terms of the logistics of the demonstration as well as the final shape of the S.H.O. Coils. The build time to make the S.H.O. Drive is, and I estimate, to be around 5 hours. Since the video showing the build must be done in one take, I have to make sure that I have my ideas lined up, so this way they come out smoothly in the presentation. Also, cost information is not listed for S.H.O. Drive Alpha because it is preliminary work, but when the world's first S.H.O. drive is built, the cost information for that build will be made available. Sincerely, S.H.O. talk 20:06, 4 July 2016 (PDT)
† Some parts are not strictly required for making the world's first S.H.O. drive but were included for additional structural reinforcement or for convenience reasons.
‡ In order to demonstrate more convincingly that there are no hidden wires, batteries, and so forth, extra steps have been taken in preparation for making and presenting the world's first S.H.O. Drive.
General Parts
- † Brass Screws
- Electrical Tape
- Hex Nuts
- † Protective Edge Trim
- Washers
Phase 1 Parts
- † 2 Barn Birdhouse Kits
- ‡ Ash Wood Blocks
- ‡ Brass Hinges
- Square Nuts
- Threaded Steel Rod
Phase 2 Parts
- Bearings
- Neodymium Magnets
Phase 3 Parts
- Ceiling Hooks
- Magnet Wires
- Wire Connector
Phase 4 Parts
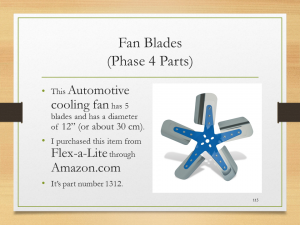
- Fan Blades
- † Narrow “Wood Shingles”
- † Plastic Furniture Tips
- † Spacers (screwed on to hold the bearings inside the panels)
- Terminal Rings
- Toggle Switch
- † Wide “Wood Shingle”
Phase 5 Parts
- ‡ Crate
- † Nylon Pipe Cleaners
Phase 6 Parts
- ‡ Plastic Spools (as spacers)
- ‡ Clear Square Tote
Phase 7 Parts
- ‡ Acrylic Sheet
- ‡ Acrylic Tubes
- ‡ Barbell Plate
- ‡ Music Stand
Making needs
Design tools
In order to design your own S.H.O. Drive, you will need some tools to assist in the design process.
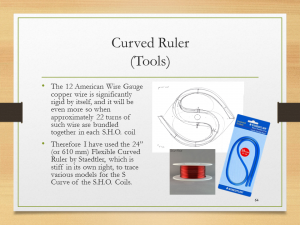
- Curved Ruler
- Visualis Electromagnetism
Once the first functioning S.H.O. drive is built, then digital design files (*.doc,*.xls,*.csv,*.dxf, etc.) will be made available for free for use in lieu of (or in conjunction with) the above items.
Safety gear
Safety gear is an absolute must in any S.H.O. Project. See to it that you have this covered.
- Dust and Particle Mask
- Fire Extinguisher
- First Aid Kit
- Safety Goggles
- Work Gloves
Work space
Depending on your resources, you may have a dedicated working space already in place, such as many have in their own private tool shed or garage. Others are not necessarily as fortunate.
- Portable Work Bench
- Cabinets
- Plywood Surface
Hand tools
Hand tools are essential for any S.H.O. Drive maker. The following is a list of tools that were planned per the plan for S.H.O. Drive Alpha (no acrylic) and the actual build (no wood).
- Adjustable Wrench
- If you prefer a non-adjustable wrench, that will work too.
- C-Clamps
- Circle Template
- Crimper Tool
- Laminate Scorer
- Mailing Tube
- The 2.25" diameter mailing tube that came with the acrylic rods was ideal for the project.
- This is a low cost, lightweight option for making a spool. If you rather make a spool out of better (probably heavier) materials, then that works fine.
- Metal Spring Clamps (with rubber tips)
- The purpose of this is to hold a work piece that may be too large for the C-clamp you have.
- Technically you could use your C-clamp, as long as you use wood spacers or other means to improve grip and reduce damage to the work pieces.
- Nylon Fasteners
- These would be large enough to hold together the coil windings.
- These help with the prepping of the coil.
- Sandpaper
- Start with coarse grain sandpaper. Alternatively, an emery board nail file may be more convenient/ergonomic for this purpose.
- Then use fine grain sandpaper.
- Screw Driver Set
-
Tubing Bender- Not an effective way to bend the copper coils. Disregard.
- X-Acto Knife
- Originally, the X-Acto Knife was intended for cutting small wooden shims[3].
- In the actual build, there are no wooden shims, and so I didn't use the the X-Acto Knife during the build.
Power tools and accessories
It is very convenient to use power tools, although more care is needed in their operation. The following is a list of tools that were intended to be used as per the plan for S.H.O. Drive Alpha:
- Compact Power Drill
- Dremel Accessory Set
- Drill Bits
- Power Drill
- Sanding Bands & Drum
In the actual build (no wood), I opted for acrylic panels. I made *.dxf AutoCAD files and sent them to Metrix Create Space[4] for CO2 laser cutting[5]. So for the actual build, I needed none of the above tools.
Sharing needs
Measuring devices and accessories
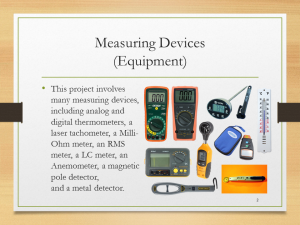
Although not strictly required to physically make a S.H.O. drive, it is very helpful to have in hand devices such as digital multimeters and thermometers, Recording data from your results is highly recommended, as it is the essential "fruit" of each project which will raise legitimacy of one's efforts.
- Analog Thermometers
- Anemometer
- LC meter
- Magnetic Pole Detector
- Metal Detector
- Milli-ohm Meter
- Non-Rechargeable Batteries
- Rechargeable Batteries
- Tachometer
- True-RMS Multimeter
- Thermal Camera[6][7]
Some S.H.O. Drives may require higher amp-capacity connecting leads than ones included with the device(s), so those should be bought as needed.
- Alligator Clip Leads
You may also want to have a supply of backup fuses.
- 20 Amp Fuses
- 200 Milliamp Fuses
Recording devices and gear
You may or may not be one of those people wanting to share their S.H.O. Drive replication to the world. For those that do, it is helpful to have a picture or video recording device.
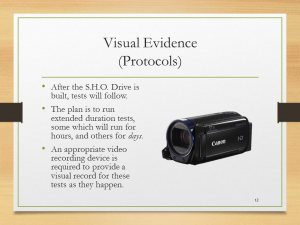
- Camcorder (or camera with video recording feature)
You will need extra data storage if you wish to shoot long videos.
- Memory Card
Additional accessories may be purchased to provide for a better camera angle.
- Tripod
- Wide Angle Lens Kit
- Adjustable Clamp Mount
If you wish to take long videos outdoor in a place where there is no outlet, you may want to hook up the camera.
- Battery Enclosure
- 12V Battery
- 12V DC Battery Cables
- DC-to-AC Inverter
- AC-to-DC Adapter (may be included with the camcorder)
Teaching needs
As more people make S.H.O. Drives, the need to teach the principles of the S.H.O. Drive will continue to grow. Whether addressing to an audience on the web or in person, presentations may be taken more seriously if appropriate visual aids are employed.
Props
Props serve as useful visual aids that can help you if need to explain something visual. Practice rehearsing with them before recording.
- Slap-wrap bracelets
- Arrow stickers
- Paper mache letters
- Chenille Straws (a.k.a. Pipe Cleaners)
- Embroidery loops
- Newton's Cradle
- Magnetic field viewer
Writing and drawing
If you need to draw a fact, figure, or equation, you will need something to draw with and write on. A good choice would be write on an erasable wall-mounted surface.
- Dry erase board
- Dry erase markers
- Wet erase markers
Multimedia tools
- Video editing software
- Image editing software
References
- ↑ Cutting out 8 pieces of 15 1/2” by 1/4” Square Acrylic Rods (Continued)
- ↑ Improving the Electrical Tape Wrap around the S.H.O. Coil Windings (Continued) + Adjusting Hook Positions (Continued)
- ↑ April 2016 Presentation → Phase 4 : Reinforcements
- ↑ Metrix Create:Space - Laser Cutting and Etching
- ↑ http://www.metrixcreatespace.com/#12hoursaday
- ↑ A high-quality thermal camera can be affordably rented from the Home Depot.
- ↑ Emissivity and the Potential Impacts on your Thermal Measurement
Site map
HQ ● Glossary ● April 2016 Presentation
|
|


